Discover the Joy of Hibachi Shrimp Fried Rice: A Complete Guide
A taste of Japan right in your kitchen
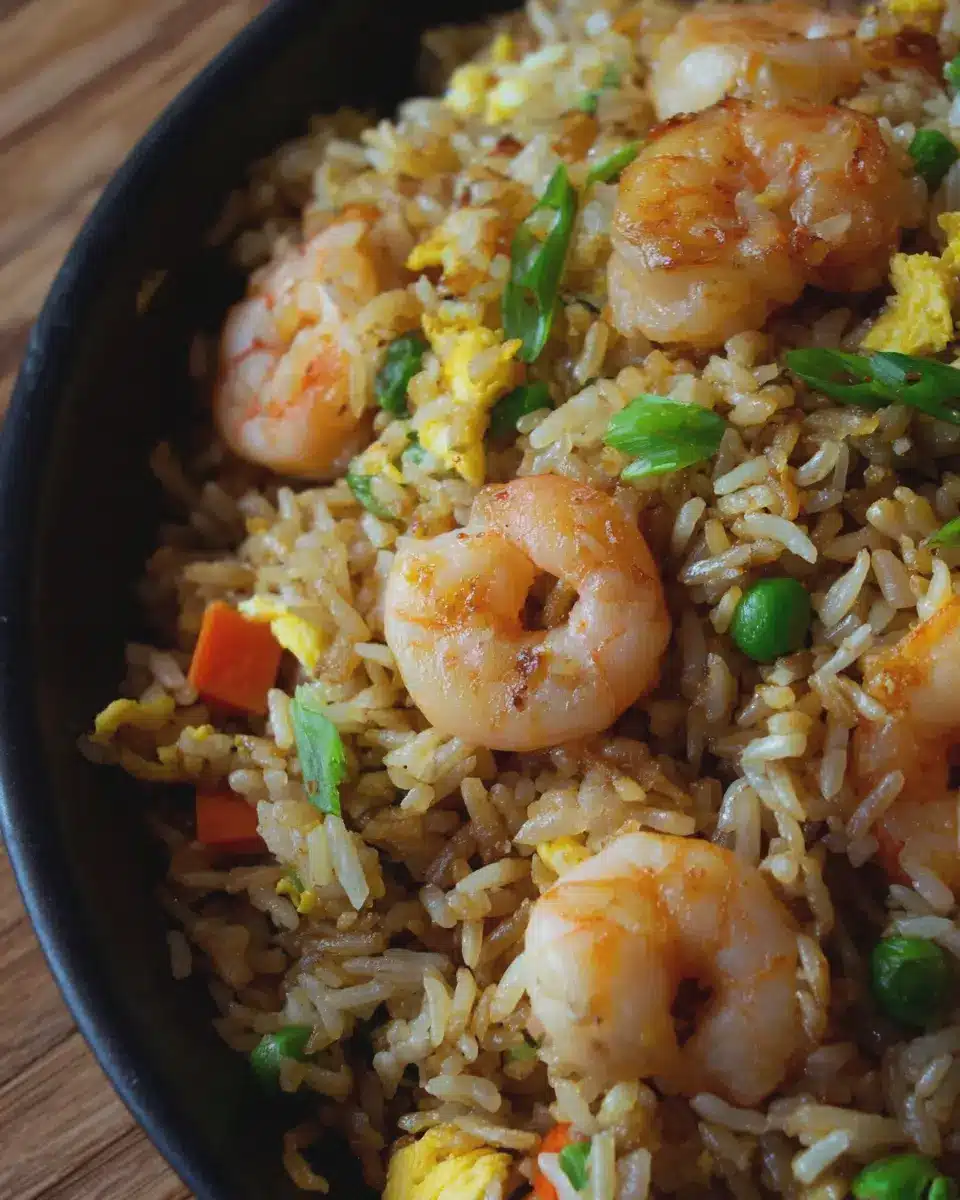
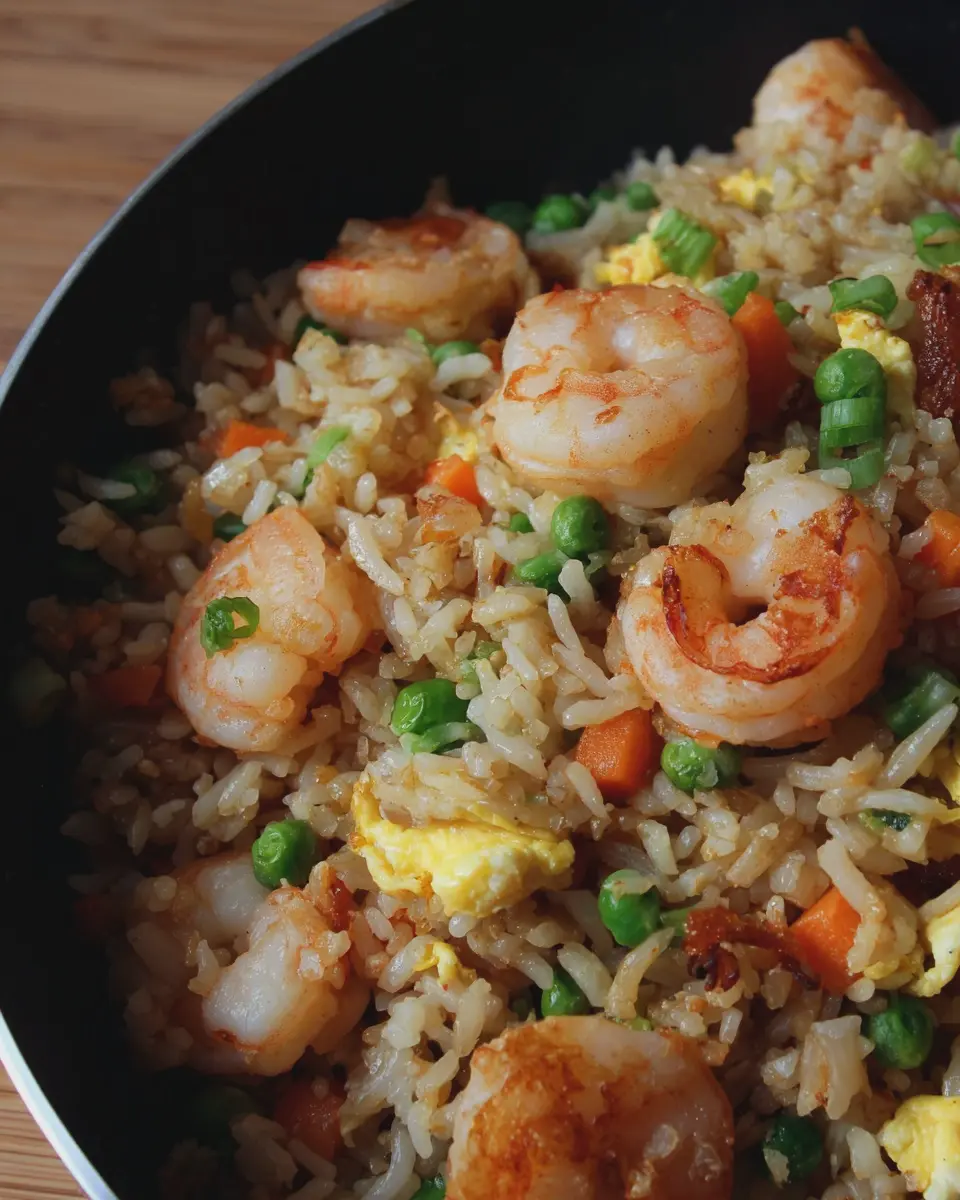
If you've ever been lured by the smoky, savory aroma of hibachi-style cooking, you're in for a treat. Hibachi Shrimp Fried Rice is more than just a meal; it's an experience that transforms your kitchen into a bustling Japanese eatery. The beauty of this dish lies not only in its flavors but also in its vibrant presentation. Imagine colorful veggies mingling with tender shrimp and perfectly cooked rice—it's like a celebration on your plate!
The key here is to use day-old rice if you can. It’s firmer and makes for a better texture—no soggy rice allowed! Feel free to experiment with fresh vegetables like bell peppers, peas, and onions. Their crunchiness adds a delightful contrast to the succulent shrimp. And let’s not forget about the magic of seasoning. A splash of soy sauce and a hint of sesame oil bring everything together, creating that classic hibachi taste that will make you feel like you’ve stepped into a Japanese steakhouse right from your home.
The perfect solution for busy weeknights
Life can get hectic, and on those busy weeknights, spending hours in the kitchen isn’t always an option. That’s where Hibachi Shrimp Fried Rice shines. Not only does this recipe come together in about 30 minutes, but it also utilizes ingredients you might already have on hand. Just think about it: with a little planning, you can whip up a wholesome, restaurant-quality dish in no time!
One of my favorite tips is to prep your ingredients in advance. Chop the veggies and marinate the shrimp ahead of time. This way, when it’s time to cook, all you need to do is toss everything in the pan. Plus, this dish is incredibly versatile. If shrimp isn’t your thing, you can easily swap it for chicken or tofu—whatever satisfies your cravings!
Got leftovers? Store any uneaten rice in an airtight container in the fridge for up to three days. Just give it a quick stir-fry to revive its flavors when you’re ready to enjoy it again.
With every bite of this Hibachi Shrimp Fried Rice, you’re not just feeding your body; you’re creating a moment of joy. So grab your spatula and get ready for a culinary adventure!
Ingredients You’ll Need for Hibachi Shrimp Fried Rice
Essentials to Make Your Hibachi Night Special
Creating the perfect hibachi shrimp fried rice at home is all about striking the right balance between flavors and textures. Here’s what you’ll need to bring your hibachi night to life:
- Shrimp: About 1 pound of medium-sized shrimp, peeled and deveined. Fresh shrimp offers a sweet flavor, but frozen works just as well if that’s what you have on hand.
- Rice: 3 cups of day-old jasmine or basmati rice, which works wonderfully for fried rice thanks to its fluffy texture. Freshly cooked rice can become mushy, so aim for leftovers when possible.
- Vegetables: An assortment of veggies adds color and crunch. I recommend 1 cup each of diced carrots, peas, and green onions. Don’t forget a handful of bean sprouts for that extra crunch!
- Eggs: 2 large eggs, lightly beaten. They add a beautiful richness and are essential in a traditional fried rice dish.
- Soy sauce: About 3 tablespoons for that classic umami flavor. Feel free to opt for low-sodium if you're watching your salt intake.
- Sesame oil: 1 tablespoon for a nutty aroma that truly elevates your dish. A little goes a long way!
- Garlic and ginger: Use 2 cloves of minced garlic and a teaspoon of grated fresh ginger for an aromatic punch.
Fresh vs. Frozen Ingredients: What’s the Best Choice?
When it comes to your hibachi shrimp fried rice, both fresh and frozen ingredients have their pros and cons. Fresh vegetables and shrimp usually provide the best flavor and texture, making your dish vibrant and appealing. However, frozen options can be a convenient and time-saving alternative, especially if you're short on time. Just be sure to thaw everything properly and drain excess moisture to avoid watery rice!
From my experience, mixing fresh and frozen ingredients often gives you the best of both worlds. So go ahead—use what you enjoy and what you have. Your homemade hibachi night will be delicious either way!
Kitchen Tools for Easy Hibachi Cooking at Home
Must-have gadgets for a perfect hibachi experience
If you're planning to dive into the delicious world of Hibachi Shrimp Fried Rice, having the right tools can elevate your at-home cooking experience. Here’s a rundown of essential gadgets that can help you create that authentic hibachi feel:
- Wok or Large Skillet: The star of the show! A well-seasoned wok allows high-heat cooking, giving your rice that delightful stir-fry flavor. If you don’t have a wok, a large non-stick skillet will do just fine!
- Spatula: You’ll need a sturdy spatula for that classic hibachi tossing action. A wooden or bamboo spatula is perfect for stirring without scratching your cookware.
- Hibachi Grill: If you’re ready to invest, an outdoor hibachi grill can bring that smoky flavor directly to your backyard. Nothing beats that charred aroma while cooking!
- Skewers: Great for grilling shrimp or veggies, skewers help you serve up perfectly cooked pieces that are easy to enjoy.
Tips for using regular kitchen tools as alternatives
Don’t stress if you don’t have all the fancy gadgets. Many regular kitchen tools can step in beautifully. A large saucepan can work as an alternative to a wok—just keep the heat medium-high. Instead of a hibachi grill, a cast-iron pan placed on the stovetop can mimic that searing effect.
And as for spatulas, if you only have a regular flat spatula, gently scrape to prevent sticking, and that sizzling sound will still make you feel like a hibachi chef. Cooking should be fun, not daunting! Feel free to improvise and let your creativity shine while whipping up this satisfying dish. Happy cooking!

Step-by-Step Instructions for Perfect Hibachi Shrimp Fried Rice
Creating the ultimate Hibachi Shrimp Fried Rice is about enhancing the experience, and that starts with a few key steps. Let’s dive into this delicious journey together!
Step 1: Whisk together the flavor-packed Yum Yum sauce
Before we get to the rice, let’s whip up the star of the show: Yum Yum sauce! It adds that creamy, tangy kick synonymous with hibachi restaurants. Here’s a quick and easy recipe:
- Ingredients:
- 1 cup mayonnaise
- 2 tablespoons ketchup
- 1 tablespoon rice vinegar
- 1 tablespoon sugar
- A dash of garlic powder
- Salt and pepper to taste
In a small bowl, combine all the ingredients and whisk until they’re smooth and well-blended. The color should be a delightful pale pink. Plus, you can adjust the flavors to your liking; maybe you want a bit more vinegar for that tang, or a pinch extra sugar for sweetness—have fun with it! This sauce not only serves as a perfect dip but also elevates your fried rice to the next level.
Step 2: Get your grill or flat top ready for frying
Now that the Yum Yum sauce is ready, it’s time to prepare your cooking setup. If you're using a flat top grill or a traditional frying pan, make sure it’s on high heat. This will create that lovely “char” flavor reminiscent of hibachi cooking.
Quick Tip: If you have a griddle, that’s fantastic! The large surface area allows for tossing and stirring your ingredients seamlessly. If you're working with a pan, just make sure it’s wide enough to spread out the rice, ensuring even cooking.
Step 3: Master the art of hibachi-style fried rice
Now let’s get down to business—the rice! For the best texture, make sure you’re using cold, day-old rice. Here’s how to get that perfect fried rice consistency:
- Ingredients:
- 4 cups cold cooked rice (preferably jasmine or basmati)
- 2 eggs, lightly beaten
- 1 cup mixed vegetables (like peas and carrots)
- 3 green onions, sliced
- 2 tablespoons soy sauce
- 1 tablespoon sesame oil
- Salt to taste
In your hot grill or pan, drizzle a little bit of sesame oil. Pour in the beaten eggs, and scramble them quickly until cooked through. Push them to one side, then toss in the mixed vegetables and green onions. Stir-fry them for a couple of minutes until they’re just tender but still vibrant.
Next, add the cold rice to the pan along with the soy sauce and a pinch of salt. The cold rice grains will separate and not clump together, giving you those distinct bites—important for achieving a hibachi feel! Stir everything together, allowing the rice to get heated through and flavored, about 5-7 minutes. Take a moment here—just breathe in that delicious aroma; it’s heavenly!
Step 4: Cooking the shrimp to juicy perfection
Now, let’s talk shrimp! Cooking shrimp is quick and simple but can be a bit finicky, so here’s what you want to do:
- Ingredients:
- 1 pound shrimp, peeled and deveined
- 2 tablespoons soy sauce
- 1 tablespoon garlic, minced
- A sprinkle of black pepper
In a separate hot pan or on the edge of your grill, quickly sauté the shrimp in just a bit of oil. Toss them in soy sauce and garlic, cooking until they turn pink and are just opaque—this usually takes around 3-4 minutes, depending on their size. Be careful not to overcook them; they can become rubbery!
Step 5: Combine and serve for a satisfying meal
Finally, it’s time to put everything together! Fold the shrimp into your perfectly cooked fried rice, giving it a few more stirs to combine all those flavors. And if you’re feeling extra fancy, drizzle a bit more of your homemade Yum Yum sauce on top.
Serve immediately while it’s warm, garnished with a few extra green onions and a side of that delicious sauce for dipping. Each bite of this Hibachi Shrimp Fried Rice is pure comfort!
Feel free to experiment—add extra veggies or switch out shrimp for chicken or even tofu, if that’s more your style. Cooking should be a joy, not a chore, and this dish is all about creating that satisfying, homemade feel. Bon appétit!
Expert Tips to Elevate Your Hibachi Shrimp Fried Rice
Strategies for achieving that restaurant-quality flavor
You know that delightful punch of flavor you get at a hibachi restaurant? It’s not just the sizzling hot grill; it's all about the ingredients and the techniques. Here’s how to recreate that at home:
-
Use Day-Old Rice: Freshly cooked rice tends to be too sticky. For perfect fried rice, use day-old rice stored in the fridge. It’ll create that ideal bite and texture your taste buds crave.
-
High Heat is Key: When you’re ready to fry, turn up the heat! A hot pan helps to caramelize the shrimp and gives that wonderful smoky flavor—think of the gorgeous char you enjoy at those teppanyaki tables.
-
Season with Soy Sauce and Sesame Oil: When you add soy sauce and a drizzle of sesame oil, you instantly elevate the dish. This combo packs a flavor wallop! If you want to add a little more depth, try a splash of oyster sauce or tamari for a gluten-free twist.
-
Don’t Overcrowd the Pan: If you’re making a big batch, fry in smaller portions. This prevents the temperature from dropping too low, ensuring everything gets that beautifully golden brown crust.
How to customize the dish to suit your palate
The beauty of homemade hibachi shrimp fried rice is that you can tailor it to your own taste or dietary needs! Here are a few ideas to get you started:
-
Vegetable Medley: Feel free to toss in veggies you love—think bell peppers, peas, or bok choy. If you’re feeling adventurous, a handful of mushrooms can add an umami punch!
-
Spice it Up: If you're a fan of heat, adding some chili flakes or sriracha can give your fried rice a kick. Alternatively, sprinkle in some freshly cracked black pepper for a gentle warmth.
-
Protein Options: Not feeling shrimp? Swap it out for chicken or even tofu for a vegetarian option. If you’re using tofu, get that crispy texture by pan-frying it separately before mixing it in.
Cooking is all about expressing yourself and making a dish truly your own. Grab your apron and have fun experimenting!

Hibachi Shrimp Fried Rice: A Quick and Flavorful Homemade Delight
- Total Time: 25 minutes
- Yield: 4 servings
- Diet: Gluten-free
Description
A delicious recipe for Hibachi Shrimp Fried Rice that is quick to make and packed with flavor.
Ingredients
- 2 cups cooked rice
- 1 pound shrimp, peeled and deveined
- 2 tablespoons soy sauce
- 1 tablespoon sesame oil
- 1 cup mixed vegetables (peas, carrots, corn)
- 2 eggs, beaten
- 3 green onions, chopped
- 2 cloves garlic, minced
Instructions
- Heat sesame oil in a large skillet over medium heat.
- Add garlic and sauté for 1 minute until fragrant.
- Stir in the shrimp and cook until pink, about 3-4 minutes.
- Push shrimp to the side and pour in beaten eggs, scrambling until fully cooked.
- Add the cooked rice and mixed vegetables, stirring well to combine.
- Pour soy sauce over the rice and mix everything together.
- Finally, stir in green onions and serve hot.
Notes
- For extra flavor, add a splash of rice vinegar.
- You can substitute shrimp with chicken or tofu for a different protein.
- Prep Time: 10 minutes
- Cook Time: 15 minutes
- Category: Dinner
- Method: Stovetop
- Cuisine: Japanese
Nutrition
- Serving Size: 1 bowl
- Calories: 350
- Sugar: 2g
- Sodium: 900mg
- Fat: 15g
- Saturated Fat: 3g
- Unsaturated Fat: 10g
- Trans Fat: 0g
- Carbohydrates: 40g
- Fiber: 2g
- Protein: 25g
- Cholesterol: 200mg