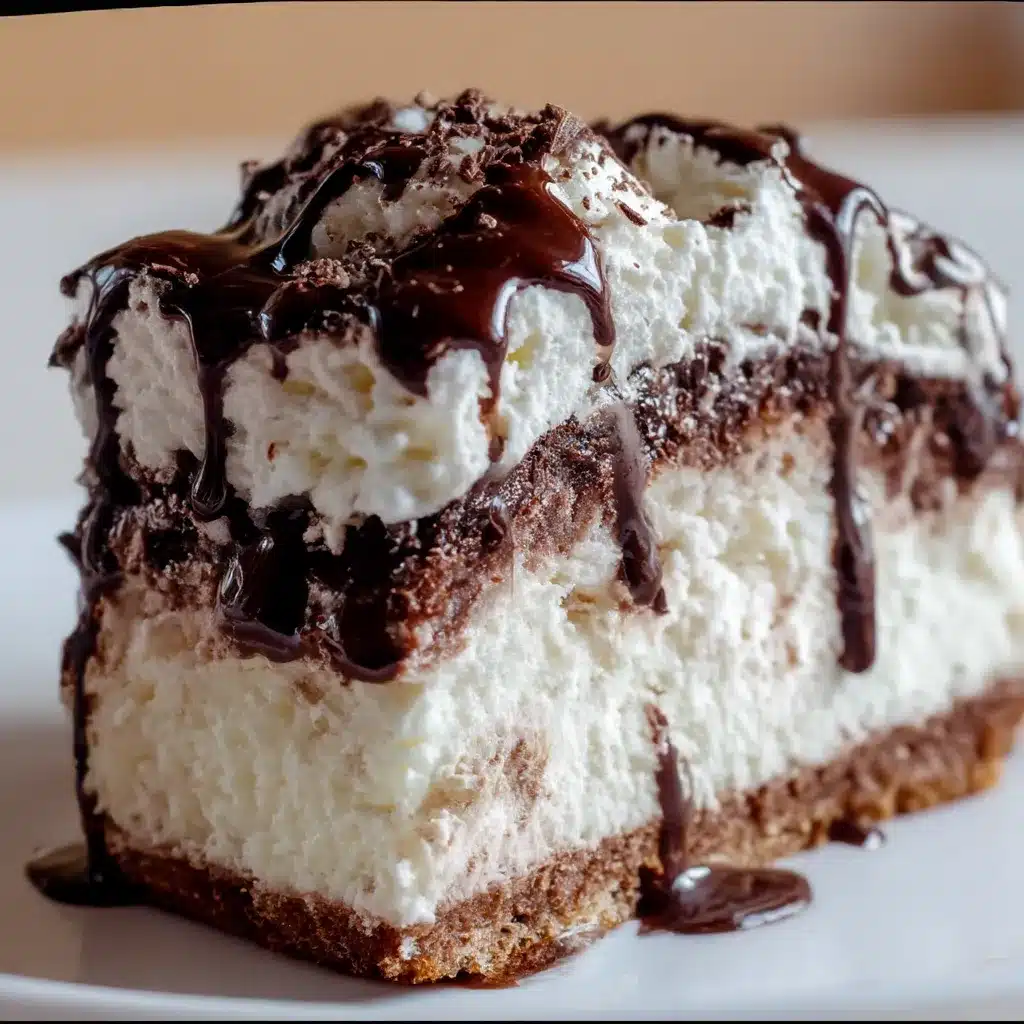
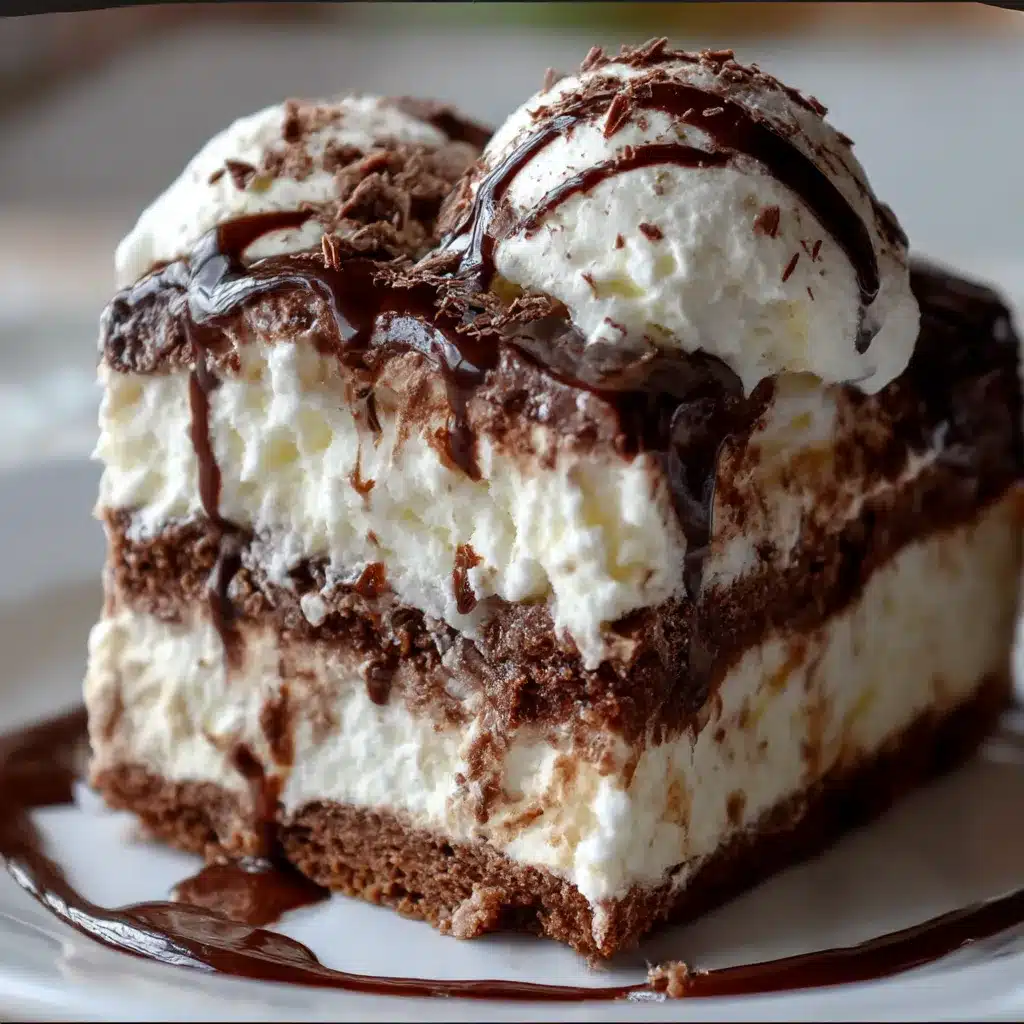
There’s something truly magical about a Hot Fudge Ice Cream Cake Slice—the way the cold, creamy layers meet a rich ribbon of fudge, all resting on a crunchy Oreo crust. It’s a dessert that feels nostalgic, joyful, and wonderfully indulgent, like the kind of treat you’d make to celebrate the little moments that matter. I still remember the first time I made this recipe on a sunny Sunday afternoon; as soon as I sliced into it, I knew it would become a family favorite. And the best part? It’s incredibly easy to put together, totally make-ahead friendly, and guaranteed to impress anyone lucky enough to enjoy a slice.
Why You’ll Love This Hot Fudge Ice Cream Cake Slice
Rich, Fudgy, and Irresistible Layers
This dessert is all about contrast—and that’s what makes every bite feel like a mini celebration. You start with a crunchy Oreo crust, the kind that gives just the right snap when your fork dives in. Then comes the silky vanilla ice cream layer, cool and creamy in all the right ways. And just when you think it can’t get any better, a gooey blanket of warm hot fudge seals the deal. It’s rich, chocolatey, and deeply satisfying without ever feeling too heavy.
Made with Simple, Everyday Ingredients
One of the best things about this recipe is how accessible it is. Everything you need can be found in a basic grocery run—no specialty ingredients, no fancy equipment, and definitely no baking involved. Whether you’re a seasoned home baker or a beginner looking for a foolproof dessert, this recipe fits right into your comfort zone.
Surprisingly Easy to Prepare
Despite its layered, show-stopping look, this is one of the easiest desserts you’ll ever make. Each step is simple and straightforward, making it a wonderful recipe to involve kids in the kitchen. Since there’s no baking, no tempering, and no complicated techniques, clean-up is minimal—just a few bowls and a freezer are all you need.
Endless Customization Options
This is one of those desserts that adapts beautifully to your cravings. You can switch up the ice cream flavor—think chocolate, cookies & cream, peanut butter swirl, mint chip, or whatever makes you smile. Toppings are open to creativity too: crunchy chocolate chips, colorful sprinkles, crushed cookies, caramel drizzle… you name it. You can even create seasonal versions, like adding crushed peppermint for a holiday twist or fresh strawberries for a summer vibe.
Ingredients for Hot Fudge Ice Cream Cake Slice
Full List of Ingredients (With Notes)
Here’s everything you’ll need to bring this dreamy dessert to life:
-
24 Oreo cookies, crushed — This forms the delicious crunchy base that holds everything together.
-
5 tablespoon melted butter — Helps bind the cookie crumbs and creates that perfect crust.
-
1.5 quarts vanilla ice cream, softened — The creamy star of the show; letting it soften makes spreading effortless.
-
1 jar hot fudge sauce — Warm it just enough to make it smooth and spreadable (but not hot!).
-
2 cups whipped cream — Adds a fluffy, dreamy finish to the cake.
-
Optional toppings:
-
chocolate shavings
-
mini chocolate chips
-
crushed Oreos
-
These ingredients come together in the most effortless, satisfying way—creating a dessert that’s comforting, celebratory, and perfect for sharing.
How to Make Hot Fudge Ice Cream Cake Slice
Making this cake is as simple and joyful as assembling all your favorite treats into one irresistible dessert. Each layer comes together smoothly, and the freezer does all the hard work for you. Here’s how to build this dreamy Hot Fudge Ice Cream Cake Slice step by step.
Step-by-Step Instructions
1. Make the Crust
This first layer sets the tone for the entire dessert—a crunchy, buttery base that holds everything together.
-
Mix the crushed Oreos with melted butter until the crumbs look like wet sand.
-
Press the mixture firmly into the bottom of a 9×13-inch pan lined with parchment paper. Pressing well helps create that satisfying “snap” when you slice into it.
-
Freeze the crust for 10–15 minutes so it sets and becomes sturdy enough for the next layer.
2. Add the Ice Cream Layer
This is where the magic begins—soft, creamy vanilla ice cream that spreads like a dream.
-
Make sure the ice cream is softened just enough to spread without melting.
-
Spoon it evenly over the chilled crust, smoothing it with an offset spatula or the back of a spoon.
-
Freeze for 1 hour, or until the ice cream is firm.
3. Add the Hot Fudge Layer
This step adds that iconic gooey chocolate layer that ties everything together.
-
Warm the hot fudge sauce just until it’s spreadable. It should be silky—but not hot enough to melt the ice cream.
-
Gently spread the fudge across the ice cream layer, moving slowly to avoid mixing the layers.
-
Freeze again for 30 minutes so the fudge firms up beautifully.
4. Add the Whipped Topping
The final layer adds a light, fluffy finish to this indulgent dessert.
-
Spread the whipped cream evenly across the fudge layer.
-
Smooth the top into a soft, cloud-like finish or make gentle swirls with the back of a spoon.
-
Freeze for at least 4 hours, or until completely solid.
Optional Step: Add Decorations
You can make this dessert as simple or as dressed-up as you’d like.
-
Sprinkle mini chocolate chips, chocolate shavings, or crushed Oreos on top.
-
Drizzle extra warm fudge for a decadent finish just before serving.
What to Serve with This Frozen Dessert
This cake slice is already a showstopper, but pairing it with the right drink or treat turns it into a complete celebration. Whether you’re hosting friends or spoiling your family, here are some ideas that make every serving feel special.
Suggested Pairings
Drinks
-
Ice-cold milk
-
A bold espresso or smooth cold brew
-
Creamy hot chocolate
-
A classic root beer float for retro fun
Desserts
-
Freshly baked chocolate chip cookies
-
A bright, refreshing fruit salad
-
Fudgy brownies for the ultimate chocolate pairing
Perfect For These Occasions
-
Birthday parties
-
Summer BBQs
-
Movie nights
-
Holiday gatherings
This dessert fits into any celebration—it’s the kind of recipe people always ask you to bring again.
Variations and Substitutions
One of my favorite things about this recipe is how easily you can customize it. Whether you want something richer, fruitier, or more festive, these variations make it easy to tailor the cake to your taste or the occasion.
Ultimate Chocolate Lover’s Version
If you can’t get enough chocolate, this one’s for you.
-
Swap the vanilla ice cream for chocolate.
-
Add a layer of mini chocolate chips between the ice cream and fudge.
-
Optional: use chocolate whipped topping for an all-chocolate finish.
Peanut Butter Fudge Ice Cream Cake
The sweet-saltiness of peanut butter pairs beautifully with chocolate.
-
Replace half the fudge layer with warmed peanut butter.
-
Add Reese’s pieces or chopped peanut butter cups for texture.
Gluten-Free Option
Perfect for guests who are gluten-sensitive.
-
Use gluten-free chocolate sandwich cookies in place of Oreos.
-
Double-check that your hot fudge sauce is gluten-free.
Mint Chocolate Ice Cream Cake
A refreshing, festive twist—especially for the holidays.
-
Swap vanilla ice cream for mint chocolate chip.
-
Scatter crushed peppermint candies on top.
Fruity Strawberry Crunch Ice Cream Cake
Bright, sweet, and perfect for spring and summer.
-
Use strawberry ice cream instead of vanilla.
-
Replace the fudge layer with a thin layer of strawberry jam.
-
Add crushed freeze-dried strawberries on top.
Storage Instructions
This recipe is meant to be made ahead and enjoyed straight from the freezer. Here’s how to store it so every slice tastes just as good as the first.
How to Store at Room Temperature
Since this is a frozen dessert, it melts quickly.
-
Keep it at room temperature only while serving—no more than 10–15 minutes.
Refrigeration Tips
Refrigeration isn’t ideal for long-term storage, but it can help when slicing.
-
Chill the cake in the fridge for 10–15 minutes to soften slightly before cutting.
-
Don’t leave it in the fridge longer than that—it will melt too much.
Freezing Instructions
Freezing is where this dessert shines.
-
Keep the cake tightly wrapped or in an airtight container.
-
It stays fresh and delicious for up to 2 months.
-
For best results:
-
Freeze uncovered for 30 minutes to firm the top.
-
Then wrap in plastic wrap and foil.
-
Store inside a freezer-safe airtight container if possible.
-
Make Ahead Instructions
Planning ahead? This dessert is a dream for parties and gatherings.
-
Prepare it 1–2 days in advance.
-
Let it sit at room temperature for about 10 minutes before slicing.
-
For cleaner cuts, dip your knife in warm water between each slice.
Recipe Tips and Tricks
Making a perfect Hot Fudge Ice Cream Cake Slice is easier than you think—especially with a few simple tricks up your sleeve. These tips help you get those clean layers, smooth slices, and a dessert that looks as good as it tastes.
-
Soften the ice cream at room temperature for 10–15 minutes. It should be scoopable, not melty, so it spreads without pulling up the crust.
-
Use parchment paper to line your pan. It makes lifting and slicing the cake unbelievably easy.
-
Warm the fudge gently—just until it’s spreadable. If it gets too hot, it will melt the ice cream and create uneven layers.
-
Freeze between each step to lock in those beautifully defined layers. Patience pays off here!
-
Use a hot knife for cleaner slices. Dip your knife in warm water, wipe, slice, and repeat for bakery-worthy cuts.
-
Add sprinkles or toppings before the final freeze so they settle nicely into the whipped cream.
-
For a thicker crust, use 30 Oreos instead of 24.
-
For an ultra-light topping, use Cool Whip instead of homemade whipped cream.
These small details make a world of difference, ensuring your dessert comes out picture-perfect every time.
Related Recipes
If you loved this Hot Fudge Ice Cream Cake Slice, here are more delicious no-bake and frozen treats you’ll enjoy:
FAQs
These are the most common questions people ask when searching for ice cream cake recipes—and the answers will help you make your best version yet.
Can I use a different type of ice cream?
Absolutely! Chocolate, strawberry, peanut butter, mint chip, and cookies and cream all work beautifully. Choose your favorite—or mix two flavors for something extra fun.
How do I keep the layers from mixing together?
The secret is simple: freeze between steps. Giving each layer time to firm up ensures clean, distinct layers when you slice into the cake.
Can I make this without Oreos?
Yes! You can replace the crust with:
-
graham cracker crumbs
-
chocolate wafer cookies
-
shortbread cookies
Each one gives a different—but delicious—texture.
How long should I thaw the ice cream cake before serving?
Let the cake sit at room temperature for 10–12 minutes. This softens the edges just enough for smooth slicing.
Can I use homemade whipped cream?
Definitely. Just whip the cream to soft peaks and lightly sweeten it. It adds a fresh, airy finish.
How do I prevent freezer burn?
Wrap the cake tightly in:
-
plastic wrap
-
aluminum foil
-
an airtight container
This triple protection locks in freshness.
Can I make mini ice cream cake slices?
Yes! Use muffin tins, mini loaf pans, or silicone molds for adorable personal-sized servings. They freeze and serve beautifully.
Conclusion
This Hot Fudge Ice Cream Cake Slice is the kind of dessert that brings people together—cold, creamy, and layered with pure joy. It’s indulgent without being fussy, nostalgic yet timeless, and wonderfully easy to make ahead for any celebration. Whether you’re making it for a birthday, a summer gathering, or just to treat the people you love, this recipe never disappoints.
If you give it a try, I’d love to hear how it turned out.
Leave a comment below and share your experience!
And don’t forget to pin this recipe for later so you can make it again and again.

Hot Fudge Ice Cream Cake Slice
- Total Time: 5 hours (including freezing time)
- Yield: 12 servings
- Diet: Vegetarian
Description
This Hot Fudge Ice Cream Cake Slice is a no-bake frozen dessert made with a crunchy Oreo crust, creamy vanilla ice cream, warm hot fudge, and fluffy whipped topping. Perfect for parties, summer gatherings, or make-ahead treats.
Ingredients
- 24 Oreo cookies, crushed
- 5 tbsp melted butter
- 1.5 quarts vanilla ice cream, softened
- 1 jar (12 oz) hot fudge sauce, warmed until spreadable
- 2 cups whipped cream (homemade or store-bought)
- Optional: chocolate shavings, mini chocolate chips, crushed Oreos
Instructions
- Mix the crushed Oreo cookies and melted butter until combined. Press firmly into a parchment-lined 9×13-inch pan. Freeze 10–15 minutes.
- Spread softened vanilla ice cream evenly over the crust. Freeze for 1 hour or until firm.
- Spread warm (not hot) fudge sauce gently over the ice cream. Freeze for 30 minutes.
- Spread whipped cream over the fudge layer. Freeze for at least 4 hours or until fully firm.
- Slice and serve. Add toppings if desired.
Notes
- Soften ice cream just enough to spread—it should not be melted.
- Warm fudge only slightly to avoid melting the ice cream.
- Use parchment paper for easy removal and slicing.
- Freeze between each layer for clean slices.
- Use a hot knife for neat edges.
- Great for make-ahead desserts.
- Prep Time: 20 minutes
- Cook Time: 0 minutes (no-bake)
- Category: Dessert, Frozen Dessert
- Method: No-Bake, Freeze
- Cuisine: American
Nutrition
- Serving Size: 1 slice
- Calories: 380
- Sugar: 30g
- Sodium: 180mg
- Fat: 22g
- Saturated Fat: 13g
- Unsaturated Fat: 7g
- Trans Fat: 0g
- Carbohydrates: 42g
- Fiber: 1g
- Protein: 4g
- Cholesterol: 55mg

