
Introduction to Pillsbury Biscuit Garlic Butter Cheese Bombs
When it comes to quick and easy appetizers, Pillsbury biscuits are often a go-to for many households. With their buttery layers and soft, fluffy texture, they can be the foundation for a wide range of delicious snacks. One such crowd-pleaser is the Garlic Butter Cheese Bomb, which elevates the simple biscuit with a flavorful combination of garlic, butter, and gooey cheese.
These cheesy bites are popular because they are:
- Easy to make with minimal prep time.
- Perfect for serving at parties, family gatherings, or even as a side dish.
- A great option for both kids and adults, thanks to their familiar flavors and bite-sized convenience.
What makes these Garlic Butter Cheese Bombs particularly special is their versatility. You can customize them with your favorite cheeses or add spices for a unique twist. They’re a perfect blend of indulgence and comfort, satisfying for any occasion.
For a detailed recipe and additional tips on how to perfect these bombs, check out this detailed recipe guide for step-by-step instructions.
Another great thing about these snacks is how budget-friendly they are. Pillsbury biscuits are widely available, and you can make a large batch without spending a lot. This makes them a great choice for those hosting parties or needing a quick snack solution. If you’re looking for more variations and ideas, visit this inspiring recipe collection that dives deeper into the various ways to customize your garlic butter cheese bombs.
In short, these cheese bombs are an ideal combination of flavor, convenience, and affordability, making them a must-try for anyone looking to impress guests or simply enjoy a tasty snack.
Step-by-Step Recipe Guide

Making Pillsbury Biscuit Garlic Butter Cheese Bombs is straightforward, but a little attention to detail can take your snack to the next level. Here's a simple step-by-step guide:
1. Prepping the Ingredients
To get started, you’ll need the following ingredients:
- 1 can Pillsbury biscuits
- 8 oz mozzarella cheese, cut into small cubes
- 4 tablespoons unsalted butter, melted
- 3 cloves garlic, minced
- 1 tablespoon fresh parsley, chopped
- ½ teaspoon Italian seasoning
- Grated Parmesan cheese (optional)
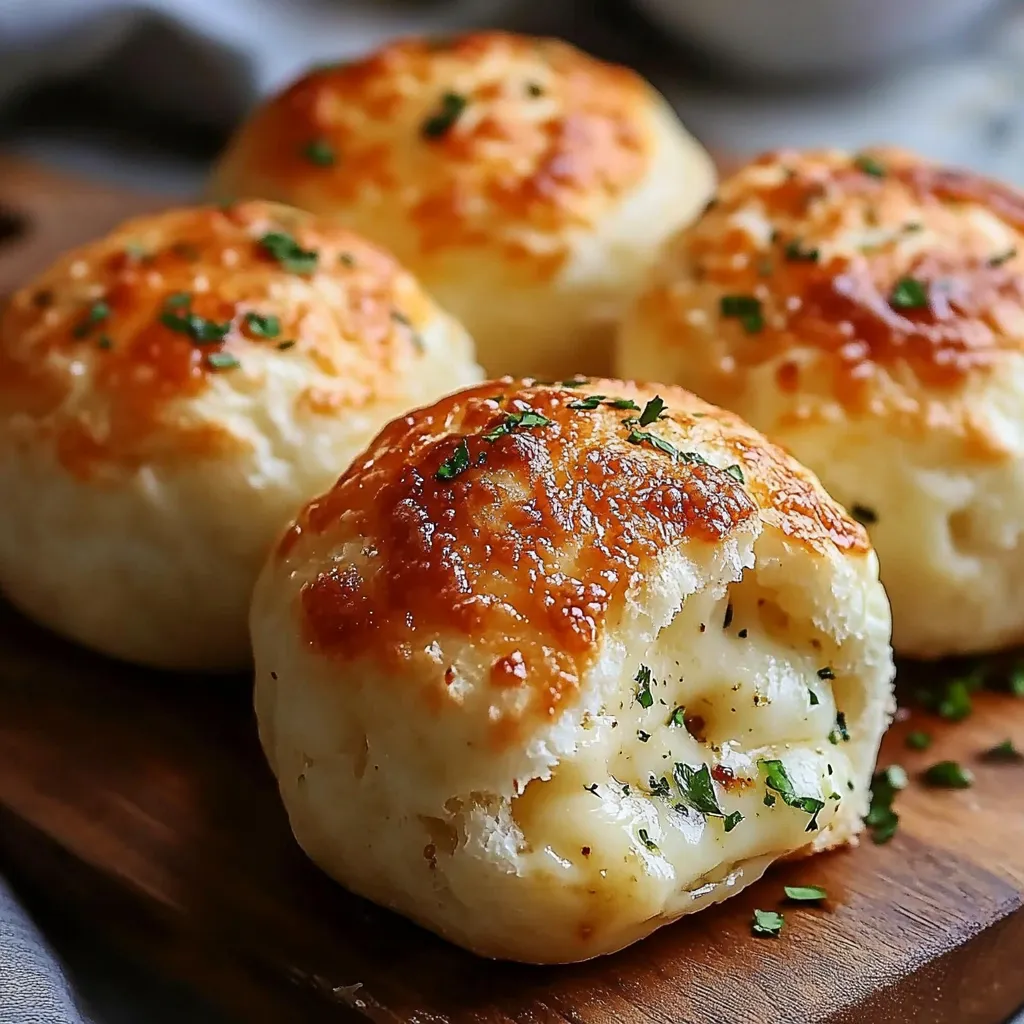
Begin by preheating your oven to 375°F (190°C). In a small bowl, mix the melted butter and minced garlic. This garlic butter will be used both for coating the bombs before baking and brushing them after they’re done.
2. Rolling and Shaping the Dough
Open the can of Pillsbury biscuits and separate the individual pieces of dough. Gently flatten each biscuit with your hands or a rolling pin to create a circular shape. Aim for about ¼-inch thickness, enough to wrap around the cheese without breaking.
3. Adding Cheese Inside the Dough
Place a small amount of your chosen cheese (about 1 tablespoon) in the center of each flattened dough piece. The cheese is the star of this recipe, so make sure it's a good, melty kind like mozzarella or cheddar.
Once the cheese is placed, fold the edges of the dough up around it and pinch them together to form a sealed ball. You don’t want any gaps where cheese could escape during baking.
4. Coating with Garlic Butter
Dip each cheese-filled dough ball into the garlic butter mixture, ensuring it’s fully coated. This will help give the bombs their buttery, golden-brown exterior and a delicious garlic flavor.
5. Baking Instructions
Place the garlic butter-coated cheese bombs on a greased baking sheet or one lined with parchment paper. Make sure there’s enough space between each to allow them to expand slightly.
- Bake at 375°F (190°C) for 12-15 minutes or until the bombs are puffed up and golden brown.
- Rotate the baking sheet halfway through for even cooking.
6. Final Touches
Once the bombs are out of the oven, brush them with any remaining garlic butter. For an extra burst of flavor, sprinkle chopped parsley or thyme on top. You can even add a bit more melted butter if you want that indulgent finish.
7. Tips for the Perfect Finish
To achieve that crispy, golden-brown crust, make sure you bake the bombs until they’re well-browned on top. If you notice the tops browning too fast while the bottoms stay pale, try moving them to a lower rack in the oven. You can also turn on the broiler for the last 1-2 minutes to give the tops an extra crisp.
Variations and Customizations

One of the best parts of making Pillsbury Biscuit Garlic Butter Cheese Bombs is the endless ways to customize the recipe. Here are some fun variations to try:
1. Cheese Variations
Switch up the flavor by using different cheeses:
- Mozzarella for a mild, stretchy filling.
- Cheddar for a sharp, tangy bite.
- Gouda or Brie for a more sophisticated twist.
2. Garlic Butter Twists
Herbs like parsley, rosemary, or thyme can be mixed into the garlic butter for added depth of flavor. You can also try adding lemon zest for a bright, citrusy twist.
3. Adding Proteins
For a heartier snack, consider adding bits of bacon, pepperoni, or shredded chicken inside the dough along with the cheese. These ingredients can enhance both flavor and texture.
4. Spicy Versions
If you like a bit of heat, sprinkle some red pepper flakes or add chopped jalapeños into the filling. This will give your cheese bombs a spicy kick.
5. Sweet Options
Looking to satisfy a sweet tooth? Turn this savory snack into a dessert by filling the dough with chocolate chips, Nutella, or caramel. Then brush the bombs with melted butter and sprinkle sugar on top before baking.
With these customizations, you can create a personalized version of Pillsbury Biscuit Garlic Butter Cheese Bombs that fits your preferences or occasion.
Serving Suggestions
Pillsbury Biscuit Garlic Butter Cheese Bombs are perfect for a variety of occasions. They make an excellent addition to game day parties, holiday gatherings, or casual family dinners. Their bite-sized nature also makes them ideal for serving as appetizers at larger events or potlucks.
To elevate the flavor, pair these cheese bombs with your favorite dipping sauces:
- Marinara sauce for an Italian-inspired snack.
- Ranch dressing for a cool, creamy contrast.
- Garlic aioli or even spicy sriracha mayo for those who love a bit of heat.
For a complete snack spread, you can serve them alongside other appetizers like mozzarella sticks, chicken wings, or a veggie platter. This ensures a mix of flavors and textures for your guests.
Nutritional Information and Dietary Considerations
Each Pillsbury Biscuit Garlic Butter Cheese Bomb contains approximately 150-200 calories, depending on the type and amount of cheese and butter used. Here’s a rough breakdown per serving:
- Fat: 10-12g
- Carbohydrates: 15-18g
- Protein: 4-6g
Tips for a Healthier Version:
- Use low-fat cheese or opt for a reduced-fat version to cut down on the fat content.
- Replace some of the butter with olive oil or use less garlic butter for coating.
- For a lighter option, try using reduced-fat biscuit dough.
Gluten-Free and Vegan Alternatives:
- Use gluten-free biscuit dough and vegan cheese to accommodate those with dietary restrictions.
- Substitute the butter with vegan butter and ensure all other ingredients are plant-based.
By making these small adjustments, you can create a healthier or more diet-friendly version of this delicious treat.
FAQs
Can I use other types of biscuit dough?
Yes, you can use other types of biscuit dough if you don't have Pillsbury on hand. Crescent roll dough, pizza dough, or homemade biscuit dough are excellent alternatives. However, the texture may vary slightly depending on the dough type. Crescent rolls, for example, will have a flakier texture, while pizza dough will be more chewy. Just make sure to adjust the baking time accordingly.
Can I make these ahead of time?
Yes, Pillsbury Biscuit Garlic Butter Cheese Bombs can be made ahead of time. To do this, assemble the bombs as directed but don’t bake them. Store them in an airtight container in the fridge for up to 24 hours. When you're ready to bake, follow the regular baking instructions. You can also reheat already-baked bombs by placing them in a 350°F (175°C) oven for 5-7 minutes until warm.
How do I prevent the cheese from leaking out?
To prevent cheese from leaking during baking, make sure to seal the dough tightly around the cheese. Pinch the edges of the dough together thoroughly, ensuring no gaps remain. You can even roll the seam side down on the baking sheet to help keep everything sealed inside.
Can these be frozen?
Yes, these cheese bombs can be frozen. After assembling but before baking, place them on a baking sheet and freeze until solid. Then, transfer to an airtight container or freezer bag. When you're ready to bake, no need to thaw—just add a few extra minutes to the baking time. You can also freeze baked bombs and reheat them in a 350°F (175°C) oven for 10-12 minutes.
Storage and Reheating Tips
For the best results, store any leftover Pillsbury Biscuit Garlic Butter Cheese Bombs in an airtight container in the refrigerator for up to 3 days. If you want to keep them longer, freezing is an option—place the cooled bombs in a freezer-safe bag or container and store them for up to 3 months.
When reheating, the oven is the best method to maintain their crispiness. Heat at 350°F (175°C) for 5-10 minutes. While you can use a microwave for quicker reheating, the texture may become a bit softer. If using a microwave, reheat for 30-60 seconds until warmed through.
Conclusion
Making Pillsbury Biscuit Garlic Butter Cheese Bombs is not only quick and easy but also a fun way to create a delicious snack or appetizer that everyone will love. With so many variations and customizations possible, this recipe is perfect for any occasion.
Print
Pillsbury Biscuit Garlic Butter Cheese Bombs Recipe
- Total Time: 22 minutes
- Yield: 8 servings
Description
Pillsbury Biscuit Garlic Butter Cheese Bombs are an easy, cheesy appetizer perfect for any gathering. Flaky biscuits are stuffed with gooey cheese and brushed with a savory garlic butter sauce, making them a hit at any party.
Ingredients
- 1 can Pillsbury biscuits
- 8 oz mozzarella cheese, cut into small cubes
- 4 tablespoons unsalted butter, melted
- 3 cloves garlic, minced
- 1 tablespoon fresh parsley, chopped
- ½ teaspoon Italian seasoning
- Grated Parmesan cheese (optional)
Instructions
- Preheat oven to 375°F (190°C). Line a baking sheet with parchment paper.
- Open the can of Pillsbury biscuits and separate them. Flatten each biscuit slightly with your hands.
- Place a cube of mozzarella cheese in the center of each biscuit. Fold the dough over the cheese and pinch the edges to seal.
- Place the cheese-filled biscuits seam-side down on the prepared baking sheet.
- In a small bowl, mix the melted butter, minced garlic, parsley, and Italian seasoning. Brush the garlic butter mixture over the tops of the biscuits.
- Bake for 12-15 minutes, or until golden brown and puffy.
- Optional: Sprinkle with grated Parmesan cheese right after removing from the oven for an extra cheesy touch.
- Serve warm and enjoy the gooey cheesy center!
Notes
- Use different cheese varieties like cheddar or pepper jack for a fun twist.
- For extra flavor, sprinkle Parmesan cheese on top before baking.
- These can be prepared ahead of time and stored in the fridge, then baked fresh when ready.
- Prep Time: 10 minutes
- Cook Time: 12 minutes
Nutrition
- Calories: 190
- Sugar: 2g
- Sodium: 450mg
- Fat: 10g
- Saturated Fat: 5g
- Carbohydrates: 20g
- Fiber: 0g
- Protein: 6g
- Cholesterol: 25mg